Argyle Cascade is the first AutoScarf pattern. It's a great starting point because the motif is easy to see as you work it up, and the rule is simple to follow as you stitch. The geometric motif grows row by row from just two things: your first two rows of stitches, and one easy-to-remember color rule. The color rule is based on a mathematical algorithm called a cellular automaton, but implementing it for each stitch is as simple as noticing the colors of three nearby stitches. The "pixie stitch" used in this pattern consists of rows of two-color stitch clusters with carried yarn caught in specific ways to interlock stitches and create clean pixellated motifs.
MATERIALS
Yarn: Worsted-weight yarn in two contrasting colors. Yardage depends on desired length of scarf.
Tools: Crochet hook in size appropriate to your yarn and tension, plus scissors and a darning needle for finishing.
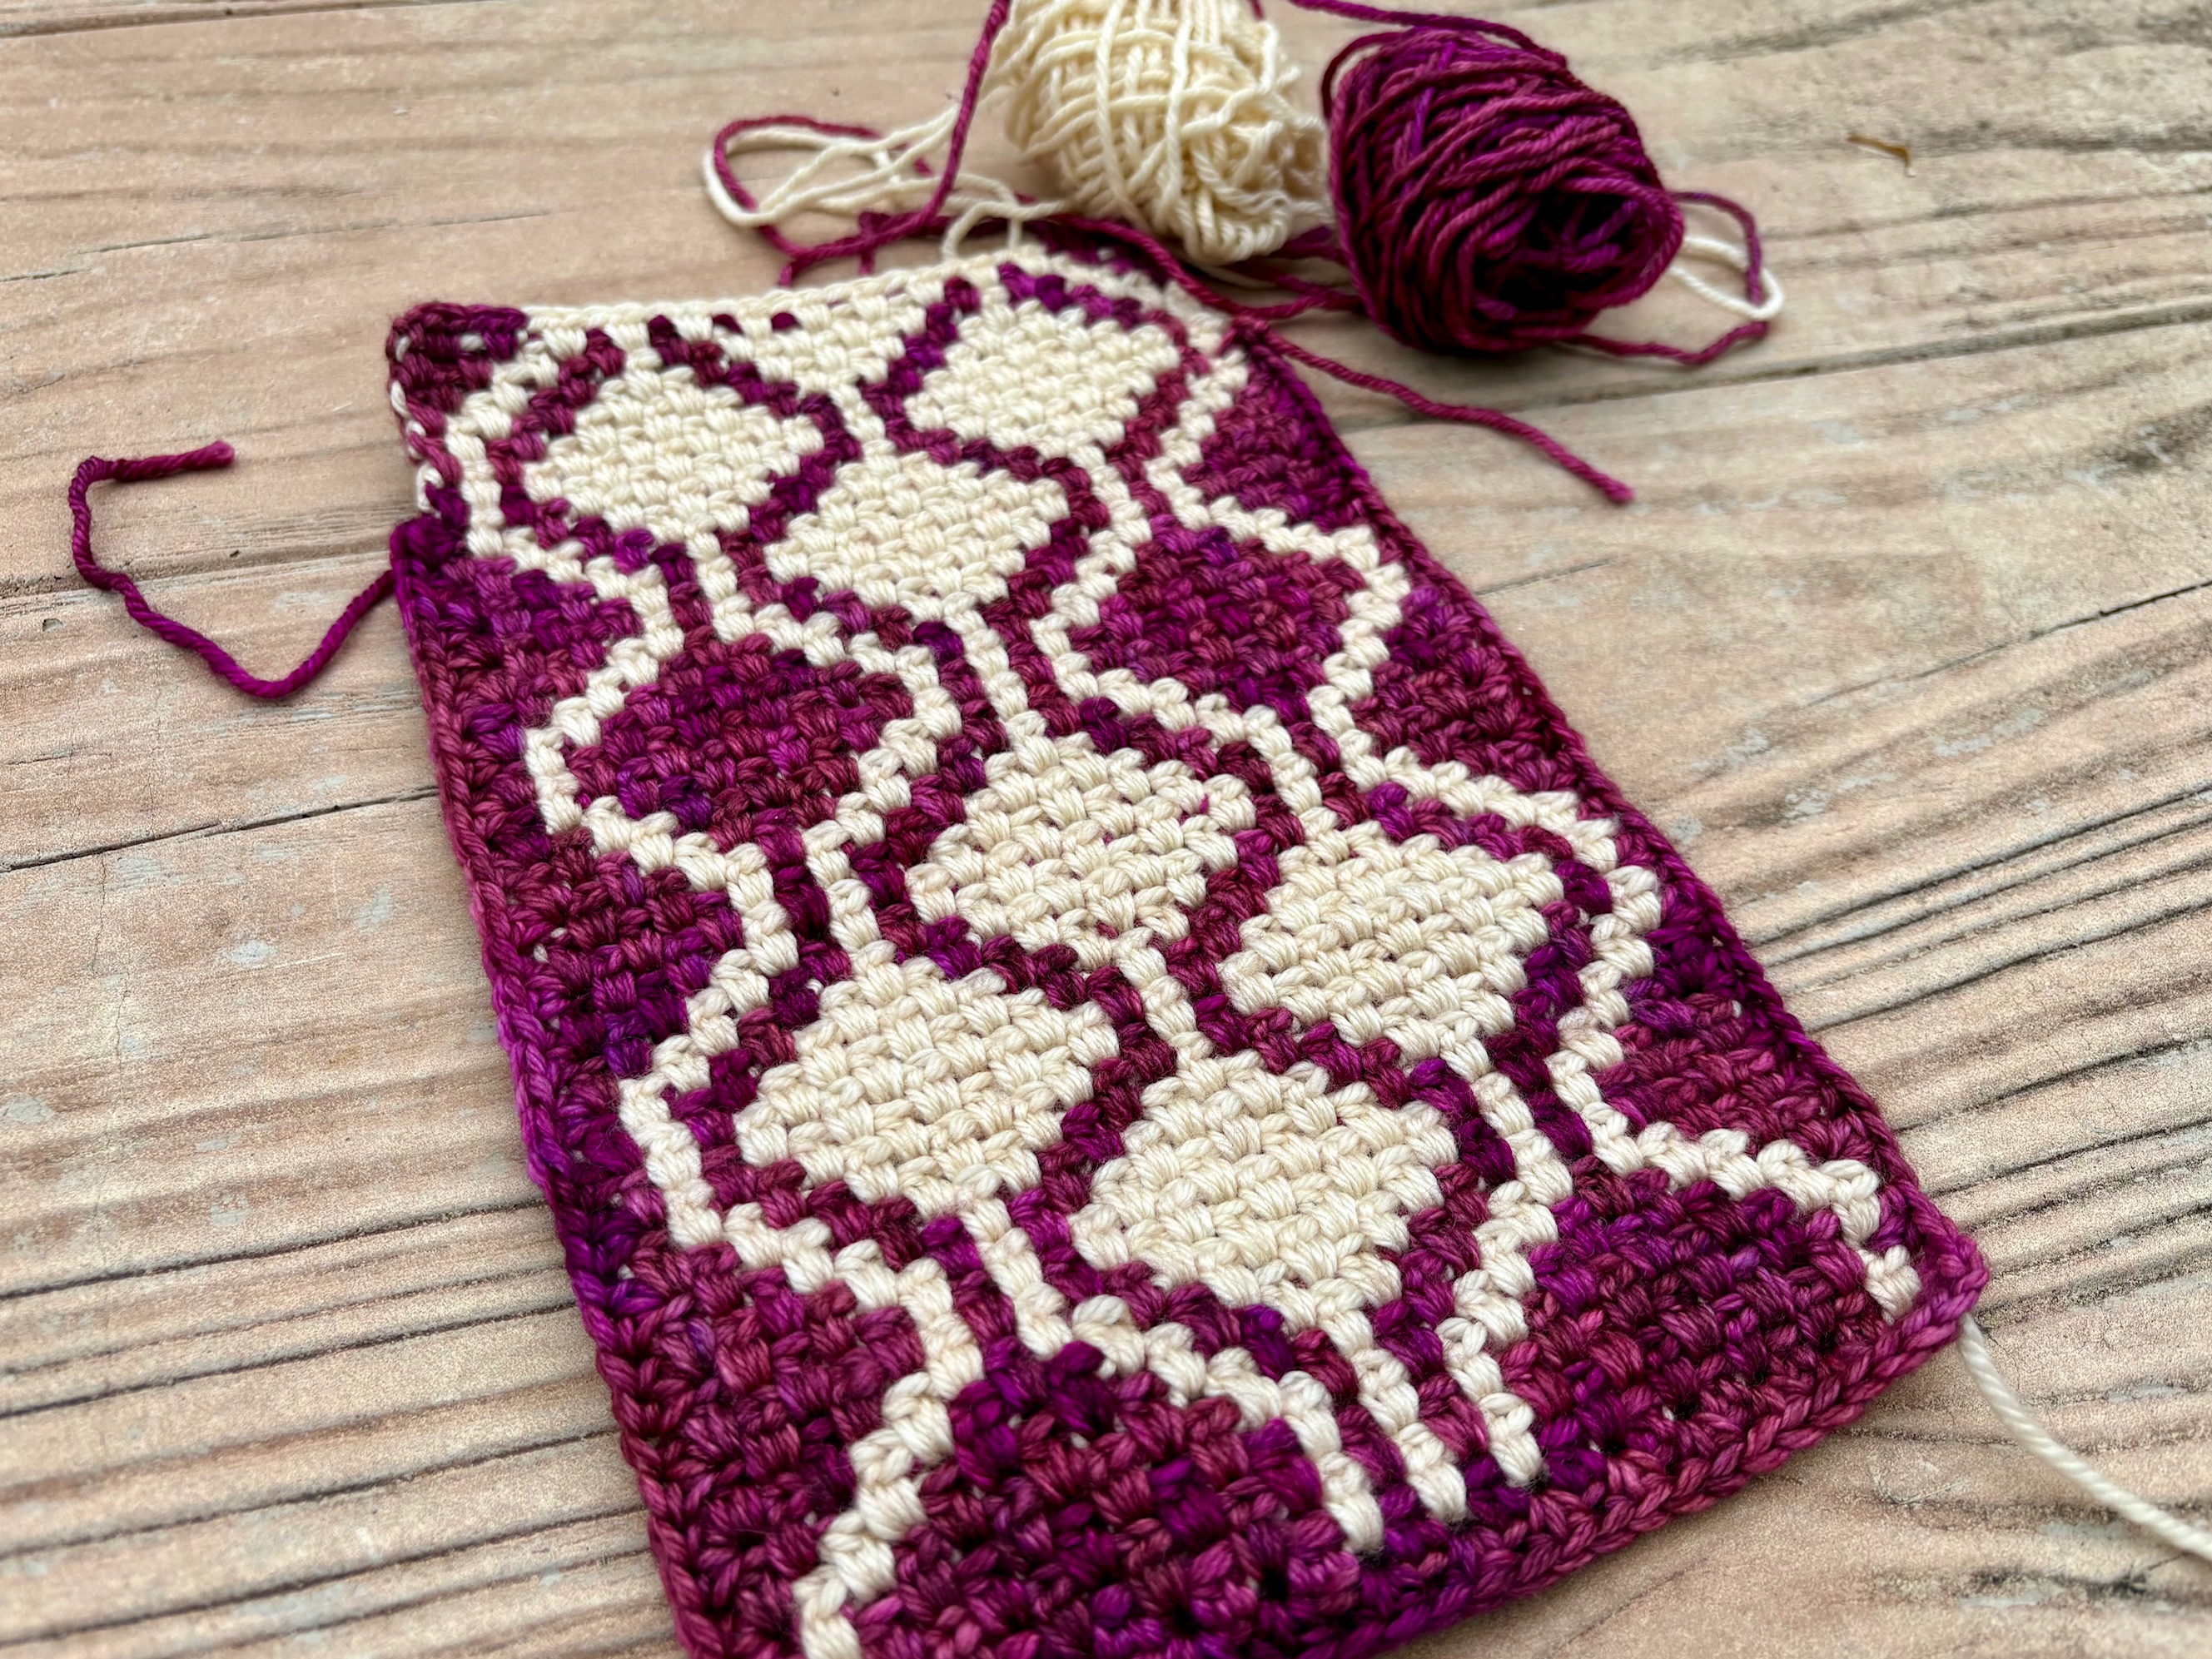
Example: The sample in the photo above was crocheted with Malabrigo Rios worsted-weight yarn and a US G (4mm) hook.
GAUGE
Measurements: This pattern is for a scarf, so there are no required measurements. The project should be fun to crochet for YOU, so adjust to what you think feels and looks the best.
Swatching: We suggest creating a swatch of 8-10 rows in the same width of the desired scarf, and experimenting with tensions and hook sizes. Try to form stitches that are kind of "bouncy" and keep the work snug without pulling on the yarn. Find that middle ground where the color transitions are the most hidden.
Example: The sample in the photo above has 13 stitch clusters in each worked row. The rows are interlocked in pairs, so there are a total of 26 stitch clusters across the work. Our gauge and tension resulted in a scarf that measures 5 3/4 inches (14.5 cm) across. For every 4 horizontal inches, this sample has 18 interlocked stitch clusters (9 in each worked row). For every 4 vertical inches, this sample has 10 stitch clusters.
ABBREVIATIONS
- MC = main color of yarn
- CC = contrast color of yarn
- ch = chain stitch
- sc = single crochet stitch
- hdc = half-double crochet stitch (US version)
- PSC = pixie stitch cluster (see Stitch Definitions)
- EC = edge cluster (see Stitch Definitions)
COLOR RULE
Each AutoScarf "designs itself", in the sense that the color used for each stitch is completely determined by the colors of nearby neighbor stitches in the rows below. We have provided a color chart for this pattern which you can follow if you like, but the magic of this pattern is that you do not need a chart!
The image below illustrates the interlocked structure of the pixie stitch pattern. The trapezoids represent the clusters you will work across each row. You will work on each side of the work from right to left, and each row of clusters will be worked into the gaps between clusters in the row below. (If you're left handed and crochet the other way, just reverse the direction.) Before you form a new stitch cluster S, you will decide what color to use by applying a simple rule based on the colors of the neighbor stitch clusters L, R, and C to the left, right, and center.
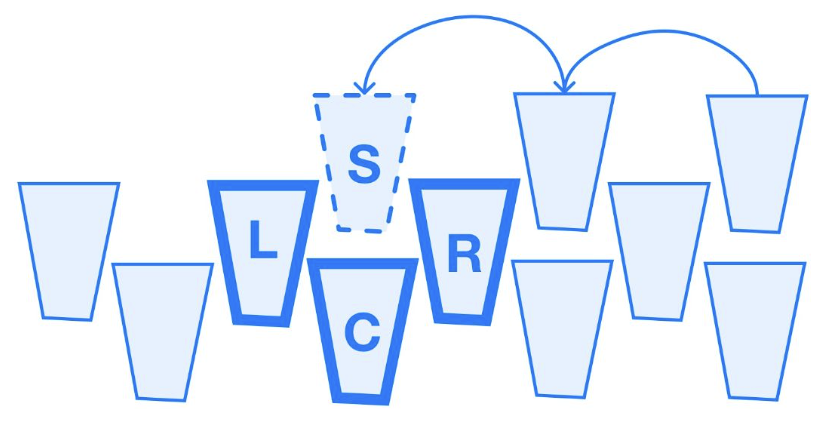
The color motif in this pattern will use "Rule 150". This is the name of the rule because it happens to be determined by binary signals 1, 2, 4, and 7, and because . But you don't need to worry about any of that! The rule has a very easy-to-remember interpretation:
RULE 150: Use CC for a stitch when either 1 or 3 neighbors are CC.
This means that for Rule 150, you will stitch with the contrast color CC when you see one of the "signals" below, and with the main color MC when you don't:
- If only
L, onlyR, or onlyCis CC, then stitchSin CC;- If all three of
L,R, andCare CC, then stitchSin CC;- Otherwise, stitch
Sin MC.
Every cluster of stitches in the pattern after the first two rows will follow this color rule. The result is the 2-color color chart shown below.
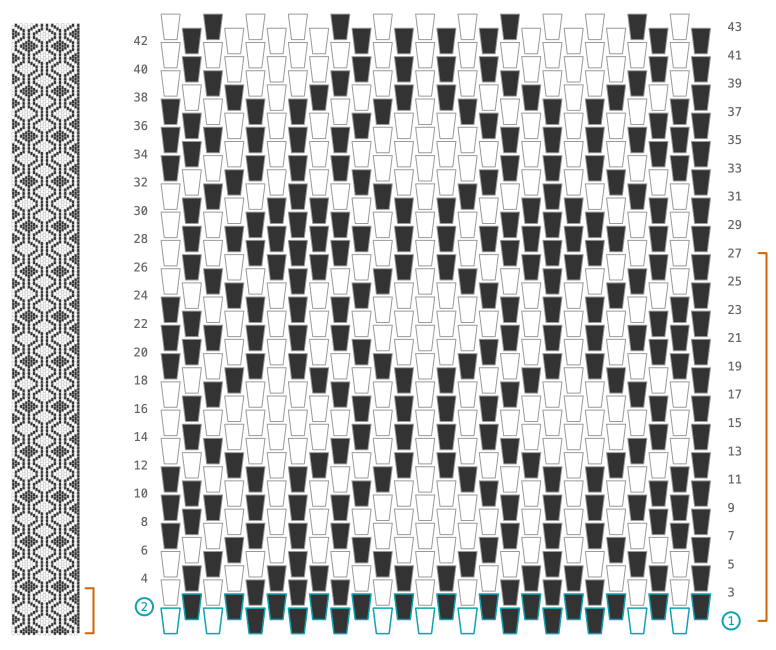
COLOR CHART
The color chart illustrates both a long stretch of the pattern and a close-up of the initial rows of the scarf. The motif repeats after row 27, as indicated by the bracket. After the chain and setup rows, start with Row 1 at the bottom of the color chart. Odd rows are worked and read right-to-left. Even rows are stitched on the other side of the work; read the chart from left-to-right as you physically stitch right-to-left. Each trapezoid in the color chart represents a cluster of stitches.
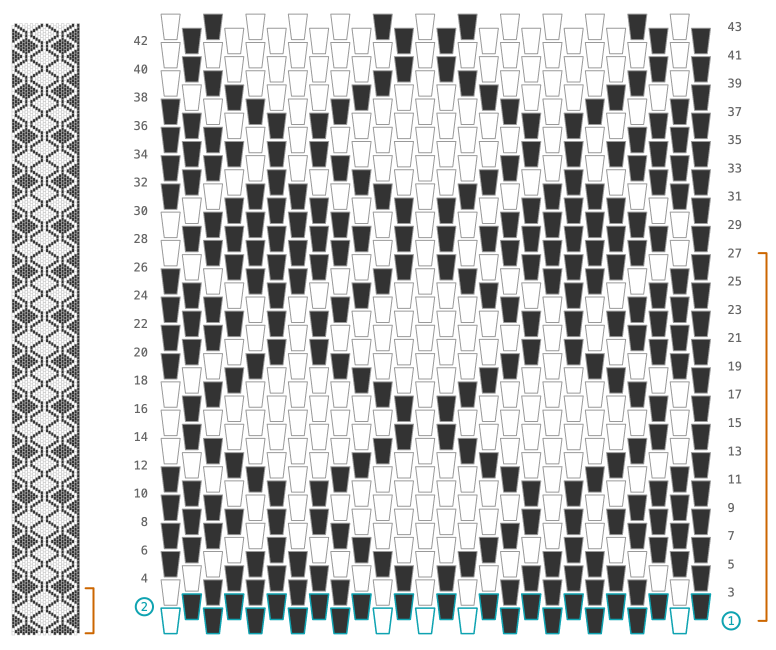
The initial two rows at the bottom of the color chart follow a specific color pattern. After those two rows, the rest of the color chart is determined by Rule 150. The entire color chart above can be summarized in just four lines of text:
- MC = Black, CC = White
- Row 1: CC in clusters 1, 6, 7, 8, and 13
- Row 2: No CC clusters
- Continue in Rule 150: Stitch in CC when either 1 or 3 neighbors are CC
If you change the color pattern in Row 1 and/or Row 2 and then follow Rule 150 after that, then you can produce a different color pattern in a similar style. You can experiment with different initial rows by mapping it out on paper or by using the AutoScarf Motif Maker at autoscarf.org/motif-maker.
STITCH CHART
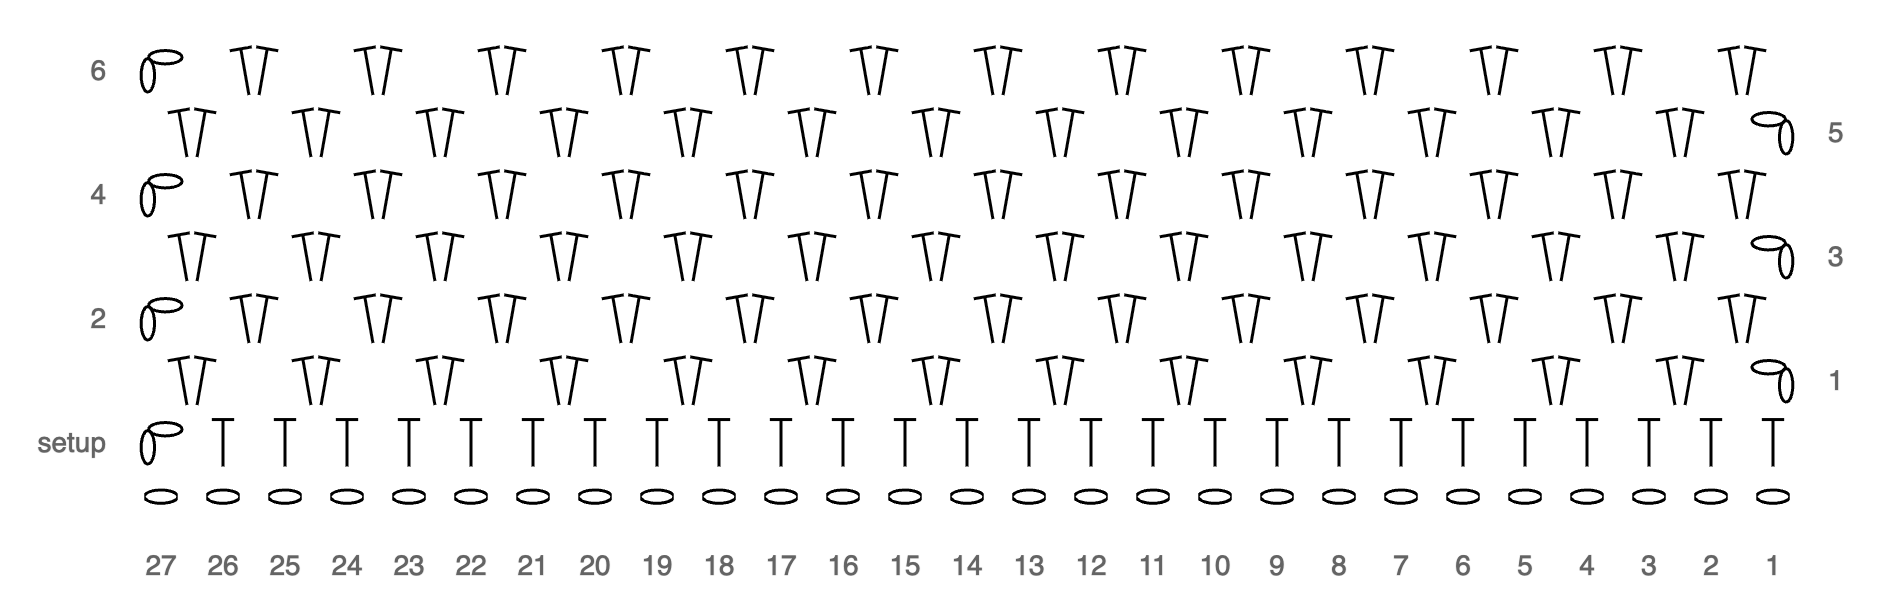
The stitch chart below shows the arrangement of stitches in the pattern. The "oval" symbols are each one chain stitch, and the long "T" symbols are each one hdc. After the setup row, the hdc stitches are placed in pairs to make PSC and EC clusters (see Stitch Definitions).
STITCH DEFINITIONS
Pixie Stitch Cluster (PSC)
The PSC is a 2hdc cluster worked in the gaps between clusters, in a way that interlocks stitches and hides color transitions.
-
Starting the PSC: Hold the carried yarn close across the top of the work and stitch over it with a hdc into a gap between clusters on the previous row. In that gap is a strand of carried yarn from when you worked the previous row; catch this strand inside your hdc stitch. Be sure to catch only the previously carried yarn, and not part of a stitch from the row below. You have now completed the first hdc of the PSC, enclosing two strands of carried yarn.
-
Finishing the PSC: Begin working another hdc into the same gap: yarn over, pull up a loop, and then pause with three loops on your hook. Consider if the next cluster is going to be in the same color you are working with. If so, then yarn over and pull through all three loops to finish the second hdc and complete the PSC. If the next cluster will need a color change, then do it now: pull the working yarn forward over the carried yarn and hold it against the front of the work, then pick up the new color and check its tension over the work since the last time it was used, then yarn over, pull through all three loops to finish the second hdc and complete the PSC.
Edge Cluster (EC)
The EC is a 2hdc cluster worked into the chain gap at the end of a row, in a way that keeps carried yarn away from the edges of the work.
-
Determining the color of the EC: The EC has no left neighbor in the row below; wrap around and use the cluster on the other side of the row as the "left neighbor" for the purpose of following the color rule. You'll have to determine the EC color before you finish the PSC immediately before, so that you are working with the correct color of yarn before starting the EC.
-
Working the EC: Hold the carried yarn across the top of the work, yarn over and pull up a loop to start a hdc stitch. Before finishing the hdc, pull the carried yarn to the right in back of the work, and stop working over it. Finish the first hdc of the cluster: yarn over, pull through all three loops. Then do a second hdc to finish the cluster, without changing colors. Finish in the color you started with; any color change needed for the first cluster of the next row will be handled after turning the work.
Starting a Row
At the start of each row, both yarns should be at the front of the work. You will either want to continue in the color of the previous row, or change colors, depending on the color chart/rule.
-
If continuing in the same color: Chain 1 in the working yarn, with a bouncy tension (not too tight). Pull the carried yarn tightly to the left so you can work over it when you continue the row.
-
If changing colors: Drop the working yarn and pick up the carried yarn. Do a tight slip stitch in the new yarn and pull the old yarn tightly down to hide the transition inside the previous cluster. Then work another chain 1 with the new working yarn. Keep the now-carried yarn in front and pull it to the left so you can work over it when you continue the row.
PATTERN INSTRUCTIONS
These row-by-row pattern instructions describe what stitches you'll work in each row. Be sure to read the Stitch Definitions carefully before attempting to follow these instructions. Use the Stitch Chart as a structural reference, and the Color Chart/Rule to determine what color to use.
Foundation Chain: Make a slip knot, then chain 27 in MC at an even, bouncy tension.
Setup Row: This entire row is worked in MC, but start carrying CC now by laying it across the working yarn, with tail to the right. Chain 1 over the carried yarn so that the carried yarn is caught in the back bump of the chain. Hdc into the third bump from the hook and then into every back bump across the row until only one bump is left. Adjust tension by stretching out the work and pulling on the carried yarn as needed. Pull the carried yarn back and to the right so that you are no longer working over it, then hdc into the last back bump. You should have 26 hdc stitches plus the chain stitch at the start of the row. Turn work counterclockwise so both yarns are in front.
Row 1 (Initial Color Pattern): Change to CC with a tight slip stitch, then ch1 and PSC into the gap after the first two stitches in the row below. PSC into every other gap between stitches as shown in the Stitch Chart, and using CC in clusters 1, 6, 7, 8, and 13 and MC elsewhere as shown in the Color Chart. EC into the chain gap at the end of the row. You should have 13 clusters. Turn work counterclockwise.
Row 2 (Initial Color Pattern): Change to MC with a tight slip stitch, then ch1. PSC into each gap between clusters across the entire row as shown in the Stitch Chart, using MC in all stitches as shown in the Color Chart. EC into the chain gap at the end of the row. You should have 13 clusters. Turn work counterclockwise.
Row 3+ (Rule 150 Begins): From Row 3 onward, apply Rule 150 and/or Color Chart to determine stitch colors for each cluster (stitch in CC when either 1 or 3 neighbors are CC). In each row, change colors at the start of the row if needed, then ch1 (see Starting a Row). PSC in each gap between clusters, and finish the row with EC in the chain gap at the end of the row. Each row should have 13 clusters. Turn counterclockwise and repeat until your scarf is the desired length.
Variants
Each of the motifs below uses Rule 150 throughout and has the same style and spirit of Argyle Cascade. The only difference from the core motif is that we have chosen slightly different locations for CC in the first row; in these examples the second row is still all MC.
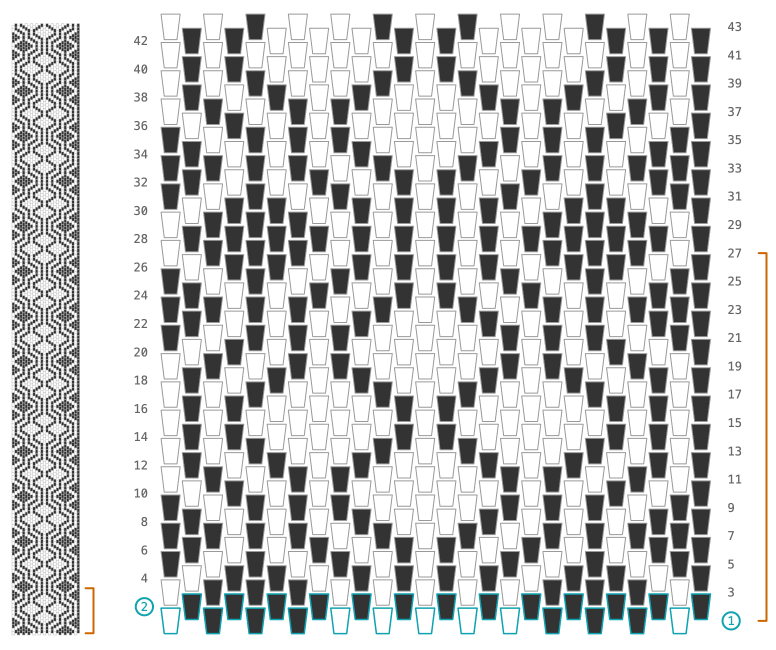
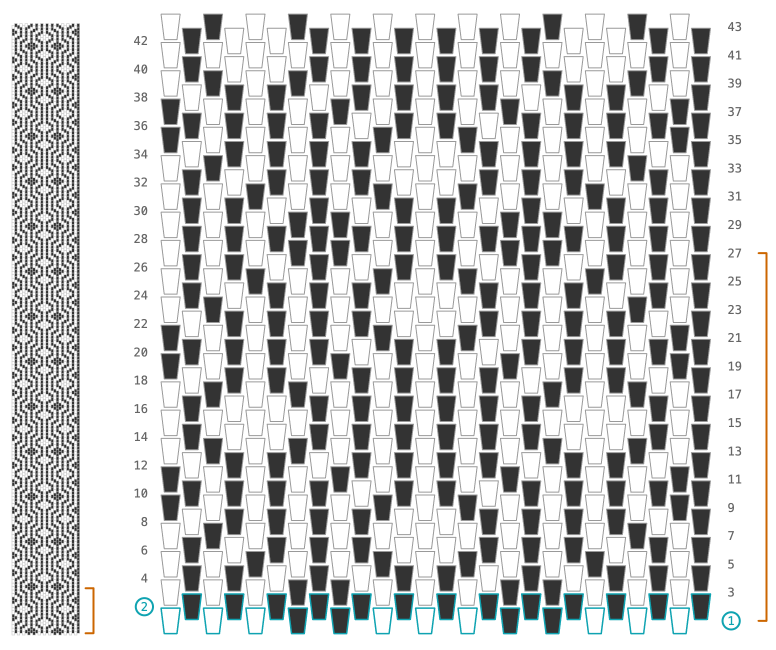
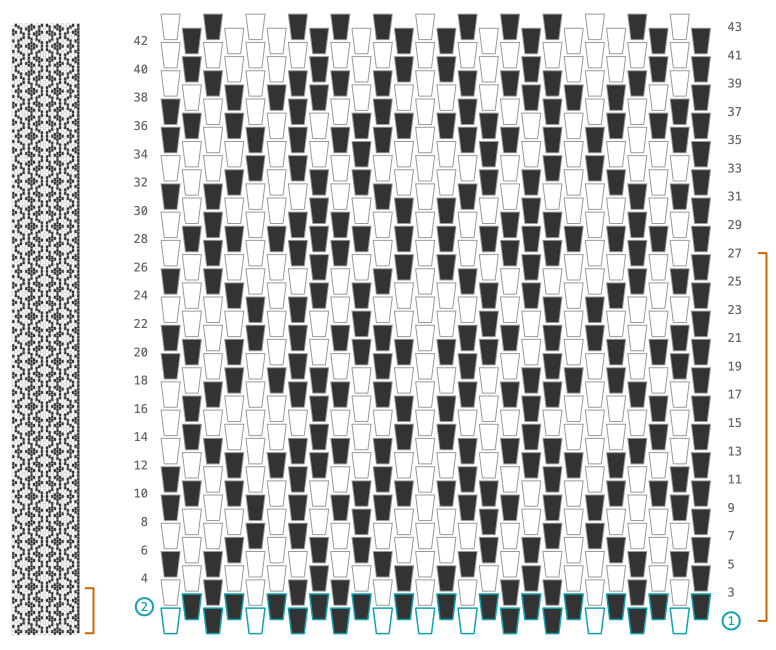
You can change the Argyle Cascade motif in many different ways depending on where the CC is stitched in the first two rows. You can also change the motif anywhere in the middle of the scarf if you want to change things up; all you have to do is change one or more of the color assignments in a row (or make a mistake and keep it), and then continue in Rule 150. You can create other variants yourself by using the AutoScarf Motif Maker at autoscarf.org/motif-maker.
DESIGNER NOTES
How to get started if you're a beginner
The most difficult part of this (any?) crochet pattern is getting started with the foundation and first few rows. If you have a friend who knows how to crochet, ask them to start the scarf for you. It will be much easier for you to learn and work from a solid starting point. By the time you finish your first scarf or swatch, you will be better at setting up the initial rows for your next attempt.
If you make a mistake
This is a scarf. Be kind to yourself and go with the flow. The scarf will still look great even if you miss a stitch, misapply a color rule, or deviate from the chart. Here are some of your options:
-
Leave it: Just keep going. Keep following the color rule and see what happens. The motif chart won't apply to you anymore but remember that you don't need it! The scarf doesn't have to match the chart, and the color rule will tell you what to do in each row. You will make your own unique thing.
-
Correct your mistake: With crochet, it's easy to rip back crochet stitches and redo whatever error occurred. If your mistake breaks the motif symmetry or changes the width of the scarf, it may be worth ripping back.
-
Start over: If you haven't done very many rows and something is going sideways, then you could consider just starting over. Making the scarf longer won't fix errors or tension issues in your starting rows. It's completely normal to start over a few times as you get the hang of the pattern, color rule, and stitch definitions; you're learning and swatching as you go.
Counting stitches
This pattern is part of the AutoScarf project, in which people from all over the world are working together to hand-craft one million algorithmic stitches. We stitch math! Please consider adding your project and your stitches to the count at autoscarf.org. Each 2hdc cluster counts as two stitches. Help us get to one million!
Why we started AutoScarf with this pattern
Many, many color patterns can be made from different initial row patterns, different color rules, and even different types of stitch structures. Why this one? We chose Argyle Cascade for the first AutoScarf pattern for three reasons. First, the interlocking pixie stitch structure uses techniques that are very similar to those that we used in the recent Granny Life community art project (grannylifecrochet.com), so we knew a lot of people would already know how to do most of the "Special Techniques" listed above. Second, Rule 150 and the particular initial conditions chosen for Argyle Cascade combine to make a very straightforward color pattern. The left/right symmetry and large areas of each color make it easy to follow the color rule and check as you go if your pattern is correct. Finally, we love the playful nature of this motif; in particular, the way that the cascading structures combine in positive and negative space to make argyle diamonds. Such complexity in such a simple form!